By Aaron Sappenfield
Fall, 1996…the Salton Sea. It’s 6 am and the dry desert heat joins forces with the distinct odor of decaying fish to create a cocktail of some of the most disgusting air you could hope to not ever have to breathe. Despite the putridity of this setting, I’m inflating a float tube for the first time in my life, gearing up to wade through a mass of rotting fish carcasses in search of monster corvina that like to slam swimbaits and provide free “towing services” to anyone willing to battle them on small floating vessels. But most significantly and yet unbeknownst to me at the time, I’m about to radically change the way I fish…PERMANANTLY. While kicking out on my float tube for the first time, I immediately realized the freedom, mobility and ease of access afforded by the use of this fishing platform. Latching on to double digit corvina was the nail in the coffin. I have not looked back since and still find fishing from my float tube one of the most enjoyable means of catching fish that I can imagine.
Fishing is a game of opportunity and a huge part of winning this “game” is a matter of statistics: the person spending the most time on the water is the one that typically will score the biggest and the most fish. So the first question you should ask yourself if you want to catch bigger and more fish is, “What can I do to get out on the water more often?” Sometimes simply finding the time to get out there can be the most difficult aspect of fishing.
So moving on to Step 1: Quit your job. I’m just kidding. In reality, step 1 is to find a new means of getting out on the water that is easier, more affordable, accessible, and more PRODUCTIVE than what you are currently doing. Purchasing my first float tube was my solution to that very dilemma!
This article will cover the basics: the essential items that you need in order to get out there on a float tube, what you can expect once you arrive at the lake, and some common courtesy that will keep your interactions on the water friendly. I will preface all of this by stating that this is coming entirely from my perspective. There are a million ways to get out there and have a great time. This is simply what I’ve found to have worked for me. You will fine tune things until you find what works best for you.
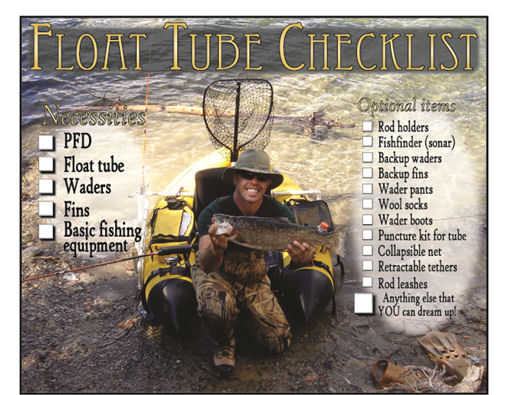
Float Tube Basics
Float tubing does NOT require a ton of gear. You truly can get into this method of fishing with minimal expense if you know exactly what you need to get into the sport and that is the purpose of this section: to list out those needs as well as some things that you may want on your boat to make your journey a little more comfortable. We’ll begin with the needs and end with the wants.
“What gear do I NEED to float tube?”
To put it briefly and concisely, here is a list of the bare essentials:
1) PFD – I put this first because safety should always be first. Not to mention that it is the law to have a PFD on board. If you think this is a joke, ask the numerous coast guard agents that have stopped me to ask if I had a PFD in the harbors. It’s no joke. Carry a PFD.
2) Float tube – This will probably be your most enjoyable purchase in this gig. I still remember clicking the “Buy” button on the tube I use now…and that was 6 years ago!
3) Waders – There are a bunch of different types of waders. The sole purpose of your waders is to keep you dry and warm. The water out at Corona Lake was 51 degrees last week. Trying to deal with that in your swim trunks would not be fun.
4) Fins – Even strong swimmers would have a difficult time moving these boats without fins. A good set of fins means staying out when the wind comes up and not having to deal with cramping legs all day.
5) Basic fishing equipment – People seem to think that you need smaller gear, shorter rods, and tiny tackle boxes to fish off a float tube and that cannot be farther from the truth! I do not fish any rods shorter than 6’6”, I carry a plus sized tackle box full of equipment on board, and I have a giant net because I’m out there looking for big fish! Whatever you are currently using to catch fish will work on your float tube.
If you already have some basic fishing equipment, you can easily pick up these essentials for well under $200. In fact, I’ve seen setups consisting of a pfd, float tube, waders and fins in the used market selling for under $100 for the entire setup.
“What gear may I WANT so that this float tubing adventure is a bit more comfortable?”
Eventually you will find that you want to go beyond the essentials. You may discover that the bare minimum is not enough even prior to your first time out. For the gearheads out there, the possibilities are virtually endless to both enhance as well as expand upon the list of items provided above. In addition to the necessities, I’ve listed just a few of the optional accessories that can be easily obtained and utilized for float tubing in the adjacent image. And though this list is lengthy, shockingly enough, this is NOT a comprehensive list!

Just to give you another idea of what you can be done to modify these things, check out the picture of my float tube. It started out as an Outcast Super Fat Cat but with all of the modifications, I’m just waiting for the DMV to require me to register it as a Class 3 RV. In fact, I’ve been asked several times while out on this beast, “Where’s the flat screen TV?” or “Do you have any beer in the fridge?!?” This thing may look like it is ready to tackle type 4 rapids, but in reality, it is an incredibly comfortable and convenient platform to fish from. The image is labeled so that you can see exactly how I have things arranged.

That image lists only the attached, “structural” components of the tube. Add on pliers, a game clip, tackle boxes, a cooler, etc. and that diagram will begin to look even more like a bowl of alphabet soup! This arrangement is only what I’ve come up with and again, the possibilities are endless. If you like to tinker, it should be obvious that you’ve come to the right place. If you want to keep it basic, that works too.
I do want to mention that I think everyone should eventually consider adding removable rod holders to their float tube package. Unlike being on a boat or on the shore, a tube affords you little space to place a rod “on deck” and have it be out of the way. Thus, in order to prevent having to keep all of your rods in your hands at all times, it is essential that you have multiple locations where a rod can be quickly hung out of the way in order to avoid missing and losing fish as well as for sheer comfort. If you counted all of the “A”’s in the image above, you’ll see that I have 7 different places that I can place my rods. SEVEN! But this does not mean that I carry seven rods. I normally carry only three but I still use all of my rod holders every time I go out. I am constantly juggling rods throughout the day and with all of the places I have on my tube to put my gear down, the juggling doesn’t feel like so much of a circus act. Rod holders are also convenient places for your pliers, scent bottles, and anything else that you can get to fit in them. You do not need to fabricate rod holders. Rod holders can be purchased from a number of retailers usually including the same retailer that you bought your tube from. Store bought rod holders normally run around $20-$30, can be used universally on most float tubes, and are easy to use.
Beyond rod holders, it is all up to you. You may be thinking, “Camera mounts? A net holder? SONAR?? BAH, who needs it?!” And you’d be totally justified in your thoughts. But I love filming what I catch, thus I need camera mounts. And I use my sonar extensively and thus I figured out a way to mount my fishfinder. And having my net behind me works perfect with my setup and so I made a mount to hold it securely in that position. But that’s just me! Take your float tube and make it your own. Experiment. PVC is a wonder material for float tubers. You can use the stuff to make just about anything you’d need on a float tube and best of all, it’s cheap and easy to work with.
Well I’m ready…LET’S FISH!
So you’ve gone through the checklist and have gotten everything that you need so that you feel comfortable on the water. Now you’re just nervous about what is going to happen once you get to the lake. What you are going to quickly find is that this is all incredibly easy and relaxing.
Sure, easy enough, but if I think back to my first time float tubing with more experienced anglers on that beautifully putrid day at the Salton Sea, I know that not having a clue can make you nervous your first time out. So the purpose of this section is to provide you with all of the information that you need to get out there and feel like you’ve done this before. We’ll go through what to do when you get to the lake, launching, where and how to fish courteously, and some basic techniques specific to float tubing that are tried and true methods of catching fish.
“What do I do when I get to the lake?”
I consider my freshwater home to be Corona Lake and that’s for good reason; the scenery is great, launching is incredibly easy, and most importantly, the fishing is incredible. This is an excellent place to float tube whether it is your first or millionth time out there. On any given day you’ll have the chance to chat with fellow tubers, explore the various “honey holes” on the lake, and fill your limits with ease. I’ve recommended a number of first timers give Corona Lake a try and none have been disappointed. Thus the following rundown is specific to Corona Lake, however, the general details provided herein will be the same no matter where you go!
I typically try to get to the lake with plenty of time to inflate and rig my tube prior to the gates being open. At Corona Lake, there is plenty of room in line to do any required inflating and rigging. Bring a headlamp or a flashlight so that you can see what you are doing. Using your car’s headlights is a bad idea. You don’t want your dead battery holding up the entire line when the gate opens!
After my tube is rigged, I place it on the roof of my car and strap it down with a standard cargo strap looped around my tube and through my rear doors. This keeps the boat plenty secure for going through the line and driving to the launch.
When you approach the booth at Corona, you will pay the standard entry fee and an additional $5 to launch the tube. If you have used your tube anywhere else other than Corona Lake recently, be sure to tell the employee tending the gate due to the ever-present Zebra/Quagga mussel concerns that lakes now must deal with. You will sign a waiver, keep a carbon copy, and you’re off on your adventure!
“Where can I launch? And more importantly, HOW do I launch?!?”
When at Corona Lake, I always launch from the area north of the boat dock. I’m not certain if there is a specific rule stating that you must launch there, but I’d rather follow the “boat launching protocol” and I find that most others feel the same way. I see others launching from other areas around the lake and while it works for them, I figure it to be a bit of common courtesy to launch in the specified area. I utilize this practice at any lake that I visit.
Park your car away from the shoreline so that it is not in the way of the shore fisherman. Inflate your tube at your car, gear it up and then carry it to the edge of the lake. Do a quick checklist to make sure that you have everything you need:
1) PFD
2) Tackle – hooks, bait, weight, etc.
3) Sunglasses – amazing how easy it is to forget your shades when you are gearing up in the dark.
4) Net
5) Stringer/creel
6) Miscellaneous – lunch, cell phone, camera, sunblock, hat, etc.
Then all that is left to do is put your fins on and kick out! Turn your boat so that when seated, your back is in the direction you want to go. Have your fins in hand and begin to walk BACKWARDS into the lake. When you are in about knee deep of water, go ahead and sit down. Hold your position by keeping your feet in contact with the ground. Put your fins on one foot at a time and you’re all ready to kick out! It’s that easy!!
While kicking out, be sure to mind the shore anglers. This does not only mean not getting tangled, this also means being mindful to avoid stomping around where the shore anglers are fishing
“Where can I fish?”
When on the float tube there may be a tendency to think that you are a tiny insignificant “speck” on the water that could in no way ever get in the way. WRONG! In the tube, you will almost always be moving and thus it is your responsibility to avoid other people’s lines and stay out of their fishing zones. This includes the shore anglers, boaters, and other float tubers. When moving, you have to be aware of your surroundings. Tangles are not only annoying; they decrease yours and other’s fishing times. Time spent unknotting your line is time not spent trying to catch fish. Plus, it’s a great way to irritate those around you. Consider a sudden splash 10 yards away from a 4 oz. torpedo sinker a warning shot signaling that you’re too close!
That being said, maintain a good distance from the shoreline. The lake rule is 100 yards. If you are having a hard time judging 100 yards, watch where people are casting and fish at least 20 yards beyond that. Same goes for boats. If you are fishing over someone’s bait, you are squashing their zone. Kicking your fins over a stationary bait in 10 feet of water is a sure fire way to ensure that bait’s safety! Don’t do it.
Beyond avoiding the other anglers, you can fish ANYWHERE! On the tube, the world is your oyster…enjoy it! Go to the treeline and put that tube in the shallows. Don’t think twice about getting in close to the rocks. Work areas in your little tube that no boat ever could! The map of Corona Lake provided with this article will give you a starting point for where to fish. These are well-known hotspots on the lake that have produced innumerable fish for me and they can do the same for you! All you have to do is get out there!!

“OK, But how do I actually catch fish on this thing?!?!”
Ah yes, the magic question…”How do I catch fish on this little boat?” The tactics you’ve learned from fishing on a boat or from shore are ALL applicable in a tube. The difference now is that you are no longer restricted to those tactics.
Some of the biggest bonuses of being in a float tube are the ability to move and the ease of controlling your drift. You’ll soon find that kicking your feet becomes instinctual. With the flick of a fin you can completely turn your boat. With the kick of your leg, you can be trolling your plastics. It’s remarkable to think about the options you have once you have the opportunity to pick up and move quickly and easily. Thus, most techniques specific to float tube fishing relate directly to the distinct advantage a float tube has in how easy it is to move.
One of the easiest means of fishing from the float tube is by utilizing the “slow troll”. Because float tubes are so mobile, it is incredibly easy to set yourself up to move slowly through an area, working your bait the entire time rather than continually casting and retrieving. This keeps your bait in the strike zone for a longer amount of time. A key point in this is to keep your bait moving. That means making sure that your boat is moving slowly ALL OF THE TIME in as linear a direction as possible. That may sound ridiculous but you’ll find that heading into the wind means an entirely different kick regime than going downwind or crosswind. A great way to make sure you are moving in a straight line is to watch the shoreline. Keep the same distance and track your position relative to a car or anything else that is stationary. You don’t need to stare, but just “check in” every now and again to make sure that you are not veering too far off course. Slow trolling is incredibly effective. Baits, plastics, jigs…you name it, you can slow troll it and you WILL eventually get bit.
Another technique that I like to use but I see used less frequently by others is what I call the “mediated drift”. When fishing on a boat and the wind comes up, I often throw a “drift chute” to slow down my drift. Drift chutes (sometimes called “sea anchors”) look like parachutes that upon opening produce drag and slow the boat considerably. Carrying a drift chute on a tube can be done, but these things could really get in the way of your fishing. So a way of being your own personal “drift chute” is to sit forward in your seat with your fins pointed straight down or slightly behind you. From that position, “flutter” your fins. By doing so, you’ll feel like you are trying to swim yourself up out of the water. This will SUBSTANTIALLY slow or even stop your drift, even in pretty strong winds. This is a really cool tool to have when the wind comes up and you want to fish downwind of a particular spot. It also works great when you have multiple lines out and you do not want to have to reel them in just to turn your boat around.
These techniques are not difficult, but they do take a bit of practice to get right. It sounds amazingly easy to slow troll a bait or to mediate your drift, but just wait until you get out there and see that there is an art to getting it right.
The biggest piece of advice I can give you in regards to your fishing is to ask questions! Float tubers in particular are often eager to discuss their rigs, their bait, or anything else fishing related! Make some friends out on the water and you’ll pick it up faster than you ever could on your own!
Summing it all up…
YOU CAN DO THIS! All you have to do is dive in. You have a list of the basic essentials that you need, you have an even longer list of the optional items you may want to acquire, you know the where, what and how’s of getting out on the water…all you gotta do is go for it! The affordability of this sport means that you can’t afford to NOT participate if you are at all interested in trying this out.